here we go DIY LPG INSTALL BY A COMPLETE LPG NOVICE.....

Message
Author
lpgnovice
Member
Posts: 51
Joined: Wed May 09, 2012 6:40 pm

here we go DIY LPG INSTALL BY A COMPLETE LPG NOVICE.....

#1 Post by lpgnovice »

Chaps i have found this section of the site so i will post some pics of what i have done so far & what i do as i go along, i bought DIY kit from a place recommened to me called Tinley Tech in cambridgeshire, seem to be very helpful chaps so far
so here we go, i brought all the bits in from my van to look them over in the house with a big mug of tea to get familer with all the bits n bobs, reading the instructions & get a half decent idea in my head of what i'm letting myself in for....

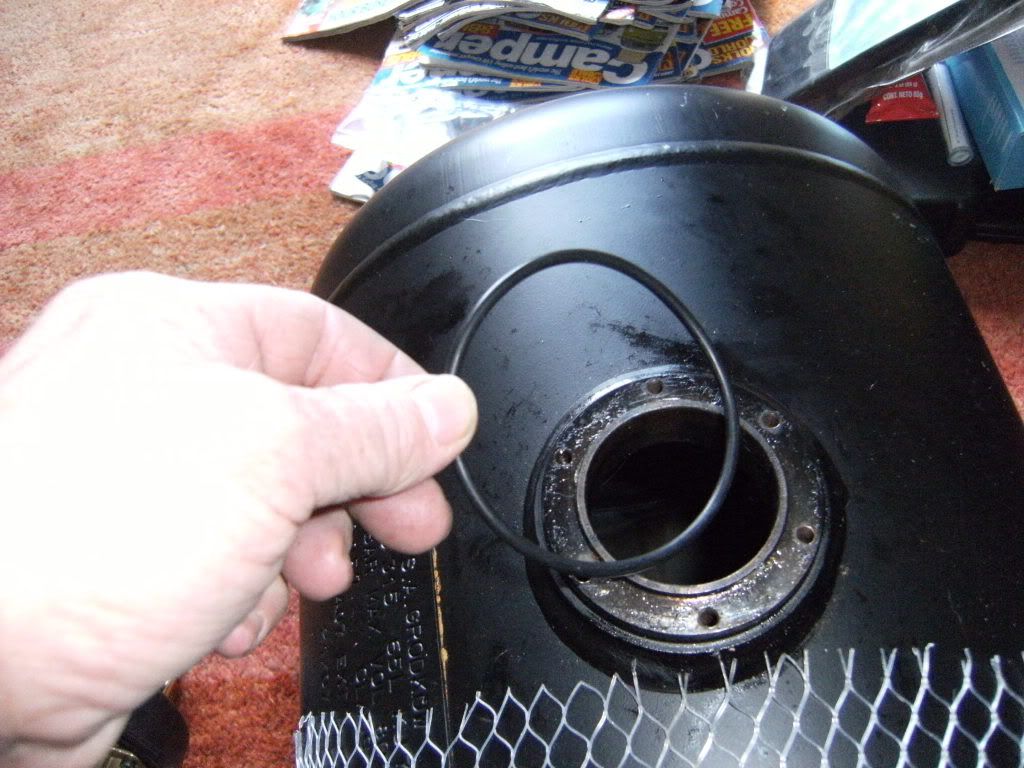
so this is what i have done so far, i have fitted the smaller O-ring to the top of the tank
Image

then fitted the gas tight plastic box type thing with the multivalve
Image

then fitted a small plastic filter type thing to the pipe on the multivalve
Image

made sure all bits were in the right position which seems logical, fitted an O-ring to the multivalve on its underside & used the bolts provided to bolt it to the tank
Image

also fitted the ank level gauge
Image

then popped the cap on to see how that fitted, i then realised i had loted the multivalve on the wrong way aound on the tank for my application
Image

so i turned unbolted the multivalve & turned it around the right way for my application
Image

cap refitted-job jobbed
Image

i then moved on to familierise myself with how the lpg filler cap go's together

the part that go's through the bodywork, i'm dreading cutting that hole & attacking my beloved motor with a file for the various slots that stop this rotating
Image

fitted it up with its O-ring
Image
Image

placed the lpg filler valve type thing in its holder to see roughly how it fits up
Image
Image

then the other end i fitted the cap to the valve to see how it locks on
Image

fitted the olive & union for this valve onto the end so i cant loose them
Image

what it should look like on the exterior of my van
Image

one piece fits inside the other & all clamps together when the bolts are used to fit it to the side of the van
Image

how the underside of the filler valve type thing looks all fitted up
Image

& once its all fitted to the van & pipes/wiring is contained within this rubber boot/cover type thing
Image

so its making logical sence so far.......any advice on each job i do is super appreciated, i'm going to take my time & not rush myself in the excitment of doing the job

next thing i'll do is fit the tank cradle & tank to my van & get back to you guys with some descriptions & pics of each stage

andy evans autogas
Installer
Posts: 472
Joined: Fri Feb 27, 2009 11:57 pm
Location: wallasey wirral
Contact:

Re: here we go DIY LPG INSTALL BY A COMPLETE LPG NOVICE.....

#2 Post by andy evans autogas »

so far so good the only advise I could give is to fit the valve & box after installing the tank ...just stops it getting damaged...
why is it you never see the headline PSYCHIC WINS LOTTERY !!!!!!!!

http://www.sstv.org.uk/autogas/index.html
twitter ... @autogasandy .... With lots of conversion photos !!
Facebook Andy Evans Autogas

lpgnovice
Member
Posts: 51
Joined: Wed May 09, 2012 6:40 pm

Re: here we go DIY LPG INSTALL BY A COMPLETE LPG NOVICE.....

#3 Post by lpgnovice »

cheers for the reply andy, thats good to hear, it confirms i'm sort of not a complete numpty :oops: :mrgreen:

i have actually took the tank cradle out of the bag & fitted the tank to it & tightend the straps just so the straps will be in the right shape for the tight space the tank is going into, so hopefully it'll make getting the straps/bolts on a little easier later in the build

i'm sorta doing a dry build out of the vehicle with all the bits that fit together or need some sort of assembly, then i will strip it all down, hopefully it'll make it a little easier than trying to learn as i go, i'm sure you guys know what i mean, should have some more progress to post up by tuesday...i should have the tank cradle & tank fitted, i gotta pick up some half decent drill bits to drill the floor of the vehicle & also i need some big washers to spread the load on the floor a bit, should be ok as its running next to a chassis member under the floorpan, i have been advised not to use stainless bolts to bolt the tank down as stainless is brittle, so i'll use hi-tensile nuts 'n' bolts with nyloc nuts with big washers as i say......

i'll have to take some pics of four rubbers i got with the tank cradle as i cant see where they are meant to go at all, keep you all posted

andy evans autogas
Installer
Posts: 472
Joined: Fri Feb 27, 2009 11:57 pm
Location: wallasey wirral
Contact:

Re: here we go DIY LPG INSTALL BY A COMPLETE LPG NOVICE.....

#4 Post by andy evans autogas »

the pieces of rubber go on to the tank frame where the tank meets the frame to prevent abrasion , depending what make of frame you have their may be 2 sets of two ,some clip over and some just push on.
why is it you never see the headline PSYCHIC WINS LOTTERY !!!!!!!!

http://www.sstv.org.uk/autogas/index.html
twitter ... @autogasandy .... With lots of conversion photos !!
Facebook Andy Evans Autogas

Tubbs
Installer
Posts: 3730
Joined: Wed Jul 27, 2011 8:21 pm
Location: Midlands
Contact:

Re: here we go DIY LPG INSTALL BY A COMPLETE LPG NOVICE.....

#5 Post by Tubbs »

The rubber boot on the back of the filler is for if you need it to attatch up to a peice if vent hose and a top hat to go through the floor to vent a leak.
If you are putting the filler through the bumper its not required, because the union is outside of the car. So if it where to leak it would be vented to the outside naturally anyway.
However its up to you if you want to put it on. It makes it harder to leak check though.
Oh and dont forget to turn the valve back on when you try and fill it ! You could be scratching your head for a while working that out when it wont fill :lol:

sijones
Intermediate Member
Posts: 917
Joined: Wed Apr 06, 2011 10:32 am
Location: Ellesmere Port

Re: here we go DIY LPG INSTALL BY A COMPLETE LPG NOVICE.....

#6 Post by sijones »

I'd also keep the solenoid connection in the box rather than in the vent, some don't have fly leads of them, so should you need to replace it, you might be short on the wire, as well as you have to undo the vent pipe as well, rather than just taking the box lid off and swapping it.

lpgnovice
Member
Posts: 51
Joined: Wed May 09, 2012 6:40 pm

Re: here we go DIY LPG INSTALL BY A COMPLETE LPG NOVICE.....

#7 Post by lpgnovice »

cheers for the advice guys well appreciated, i've got myselfa carbide drill bit today so i can get busy in the morning fitting the tank/cradle, i'm hoping all go's in easily so i can get carried away & fit the lpg filler (just loose at the moment as i want to paint my lpg cap to match the body) aswell

keep you all posted......

lpgnovice
Member
Posts: 51
Joined: Wed May 09, 2012 6:40 pm

Re: here we go DIY LPG INSTALL BY A COMPLETE LPG NOVICE.....

#8 Post by lpgnovice »

got a bit done on the van late this afternoon

to get the tank & its mounting cradle i have had to chop some metal off the rock 'n' roll bed in the back, & also cut though one crossmemember on the bed frame to squeeze the tank in, its a tight fit but i have managed it,
i must say the rock 'n' roll bed metal frame is sturdy thick metal, i actually went through five, 5" metal cutting disks cutting just two strips of metal from the two long L-section memebers of the bed frame, a right old palava!

i then used the mini grinder to chop the wooden floor under the rock 'n' roll bed so i can mount the tank cradle metal to metal as its supposed to be-safety first & all that!

BUT i got the tank in mocked up on the cradle so tomorrow morning will be about crawling under the van to see where its safe to drill the four mounting holes for the cradle, keep meaning to pick up some big fookin washers & decent hi-tensile bolts with NYLOCK nuts, a job to do when i'm out on my travels tomorrow, once the cradle is in i can bolt the tank in place & that'll be stage one done, WOOPWOOP!

one thing i desperatley need is an "angle finder" (i know i should have bought one on ebay last week) so i can set the tank in/out unions at exactly 30 degrees, once all is fitted & bolted down i should still have room for a bit of an emergancy tool-it & a bottle jack which is pretty handy!

Image
Image

my plan also is once i have the tank bolted in to add some sound deadening pads & insulation on the van panelwork behind the tank & on the floor, make it a bit quieter

keep me posted & le me know if you guys in the know think i'm going about it the right way!

cheers for the advice so far guys, truely appreciated.......

rossko
Installer
Posts: 6393
Joined: Wed May 23, 2007 6:51 pm
Location: Wiltshire

Re: here we go DIY LPG INSTALL BY A COMPLETE LPG NOVICE.....

#9 Post by rossko »

You can make a card 30-60 square
http://www.exploratorium.edu/geometrypl ... ractor.pdf
and use with an ordinary level or a plumbline.
www.blazegas.com

lpgnovice
Member
Posts: 51
Joined: Wed May 09, 2012 6:40 pm

Re: here we go DIY LPG INSTALL BY A COMPLETE LPG NOVICE.....

#10 Post by lpgnovice »

Well, a pretty good day today, got the materials i needed to mount the lpg tank cradle, forgot welding gas grrr no great shakes i'll grab it in the morn


well i drilled the front mounting holes for the tank cradle, the rears were a pain in the arse if i'm honest, i had to chop the rear jacking point out riggers a little, just the bottom part to i could access the underside of the rear floor,
Image

i welded in some 4mm plate too act as a load spreading plate for the rear tank cradle mounting bolts, then welded the bottom of the outrigger back on, ground it smooth & that pissed the neighbors right off-OOPS i did'nt think i would be that LOUD! :)
Image
drilled the front ones, they were simples!

the rear mounting bolts i am going to weld in place so i can slip the tank over the bolts for easy location of the cradle, these are being welded to the 4mm plate belot the van floor then i'll built the weld up around the bolt to meet the van floor to tie it all together-make sence, ok did'nt think so but it'll be strong as fook!

Image

rear bolt in place in the top left of the pic


the other side next to the devom camper unit


mmmmm shiney shiney

Image

Image

is it making any sence to anyone but me LOL :OD

so i'll pick up some argoshield in the morning, finish the welding & then i can bolt in the tank cradle & tank permantly, my time frame ha gone abit wayward but i'm "reet" chuffed wit hthe progress so far......

you can see in the above pic where i had to chop the rock 'n' roll bed on the bottom crossmemeeber & you may be able to make out where i have chopped the top lip off the upper one also just to get the tank to fit in :OO


i also picked up some sound deadening pads for the metel under the rock 'n' roll bed, some foil backed insulation & also some of that ready bagged fibreglass loft insulation for over the top, should help keep the sound low & the van toasty to camp in! i'm planny to rip the interiour out for a refurb/freshenup of the OG units & put sound deadening & insulation between all the panels of the body to make it quiet n warm


its getting there....
Last edited by lpgnovice on Thu May 17, 2012 7:20 pm, edited 1 time in total.

Gilbertd
Senior Member
Posts: 9258
Joined: Wed Apr 09, 2008 10:00 am
Location: Peterborough

Re: here we go DIY LPG INSTALL BY A COMPLETE LPG NOVICE.....

#11 Post by Gilbertd »

lpgnovice wrote:you can see in the above pic
What pic? I see none......
96 Saab 900XS, AEB Leo, sold
93 Range Rover 4.2LSE, Lovato LovEco, sold
97 Range Rover 4.0SE, multipoint, sold
98 Ex-Police Range Rover 4.0, AEB Leo, daily motor
96 Range Rover 4.6HSE Ascot, AEB Leo, my spare


Proud member of the YCHJCYA2PDTHFH club.

lpgnovice
Member
Posts: 51
Joined: Wed May 09, 2012 6:40 pm

Re: here we go DIY LPG INSTALL BY A COMPLETE LPG NOVICE.....

#12 Post by lpgnovice »

sorry i have buggered up the order of the pics also :? but you can se what i've done, please comment

Tubbs
Installer
Posts: 3730
Joined: Wed Jul 27, 2011 8:21 pm
Location: Midlands
Contact:

Re: here we go DIY LPG INSTALL BY A COMPLETE LPG NOVICE.....

#13 Post by Tubbs »

If you happen to have a i phone, then ihandy level app is well pretty handy ! Its all i ever use nowadays.

Gilbertd
Senior Member
Posts: 9258
Joined: Wed Apr 09, 2008 10:00 am
Location: Peterborough

Re: here we go DIY LPG INSTALL BY A COMPLETE LPG NOVICE.....

#14 Post by Gilbertd »

Or any other smartphone. I've got a Nokia N8 which runs Symbian and very few of the iPhone and Andriod apps are available for that but there is a level and angle finder.
96 Saab 900XS, AEB Leo, sold
93 Range Rover 4.2LSE, Lovato LovEco, sold
97 Range Rover 4.0SE, multipoint, sold
98 Ex-Police Range Rover 4.0, AEB Leo, daily motor
96 Range Rover 4.6HSE Ascot, AEB Leo, my spare


Proud member of the YCHJCYA2PDTHFH club.

lpgnovice
Member
Posts: 51
Joined: Wed May 09, 2012 6:40 pm

Re: here we go DIY LPG INSTALL BY A COMPLETE LPG NOVICE.....

#15 Post by lpgnovice »

i have'nt even got a mobile-phone! i'm a bit oldschool in my taste n lifestyle to be honest, i did do the pics with a digi camera but i ballsed up the order but it should make better sence when i get the tank cradle & tank mounted properly tomorrow, pics/descriptions should be in the right order WHY well its satarday & i'm having a night in with some cider :OD the brain may kick in.......... :?:

had a bit of a nightmare today with my daily driver-vauxhall chevette-dropped a valve :O( which has come at the exactly wrong time!!! 1st time i have had to use the AA

so i am more eager to sort my lpg conversion on my van asap, so i'll be updating daily i should think grrrrrrr i'm in a right old huff!

do you guys think my tank cradle method is ok? if so i should all being well get the tank filler in sunday then start the tank piping

lpgnovice
Member
Posts: 51
Joined: Wed May 09, 2012 6:40 pm

Re: here we go DIY LPG INSTALL BY A COMPLETE LPG NOVICE.....

#16 Post by lpgnovice »

i have pics to post just gotta upload them "in the right order this time" :mrgreen:

managed to get a fair bit done late this afternoon, as per usual i got carried away trying to make a nice job of what i was doing, i thought whilst i have the van panel work exposed i'll put some sound deadening bitumous pads down & on top of that some double foil insulation, so it looks fairly professional if i do say so myself 8)

i welded the bolts for the rear part of the tank cradle to the floor where i had previously welded some 4mm plate to spread the load, drilled the front mounting holes & i now have the tankmounted securely in place, just some minor final finishing jobs to make it all look spot on

i'm going to continue doing the soundproofing & insulation in the rear of my van tomorrow & make a start on cutting/drilling the hole for the lpg filler cap & mounting, i'll probobly prep & paint my filler cap to match the body also

is it right that once i have the lpg filler fitted & piped to the tank i can fill the tank with lpg, nip up the unions to be sure their not leaking, i'll use plumbers leak deter spray!!!

but no lpg will come out of the tank du to the solinoid not being activated????is that right????

cheers all

john_d
Site Admin
Posts: 1520
Joined: Fri Oct 14, 2005 7:12 pm
Location: Glenrothes, Fife

Re: here we go DIY LPG INSTALL BY A COMPLETE LPG NOVICE.....

#17 Post by john_d »

lpgnovice wrote:but no lpg will come out of the tank du to the solinoid not being activated????is that right????

cheers all
if everything is tight enough, you also have a manual cut-off switch (the yellow thing) ;)
Subaru Impreza WRX
Ford Tourneo
Nissan Primastar

lpgnovice
Member
Posts: 51
Joined: Wed May 09, 2012 6:40 pm

Re: here we go DIY LPG INSTALL BY A COMPLETE LPG NOVICE.....

#18 Post by lpgnovice »

maybe a silly question but which ways is off on that yellow fuel tap on the tank?

well been at it today in the heat-god-damn it was hot work today!!!

i usd lock-tight threadlocker on the bolts/machine screws on the fuel filler support plate, best be on the safe side, i know they wont vibrate loose or anything
Image

the tank in position with all my new sound deadening/insulation, i hav used 2 layers of those bitumin type pads you get from car body paint suppliers then two layers of double foil heat insulation which should keep the van warmer & a little quieter, all bolted down good 'n' proper, i think it looks a safe job what do you guys reckon
Image
Image

i decided to prep & paint the back of the fuel filler to stop the little nut & bolts rusting
Image

i have drilled a 30mm hole in the floor for the plastic union type thing that the vent piping will fit to, this go's to the outside of the van, this is where the 8mm fuel filler pipe will come in to fill the tank
Image

this is the other hole drilled in the bulkhead for the fuel pipe that go's from the tank to the solinoid/vapouriser/reducer
Image
this one was a bit of a bastard as my hole cutter has gone blunt so i could'nt make the diameter 30mm, so i ned to pick up a "quality" hole cutter tomorow so i can get that plastic vent pipe union fitted tomorow, then i can start fitting the rest of the engine bay components, i'm a bit pissed off that the hole cutter went blunt but hey, it was a rappy machine mart one-their stuff used to be half decent for the money but now the stuff seems to be made of cheese, load of @!##!!!

then i made the biggest cut in the body which i wasa bit nervous about, the 70mm hole for the fuel filler, for som reason it looks a bit off in the pic but in the flesh i got it spot on, smoothed the edges with a file & a scotchbrite pad then used some etch primer inside & out to key the metal for paint, got a tin of 2pak colour matched & dusted it on inside & out, this is a really stiff part of the bodywork, i'm going to make a secondry bracket that will use the existing bolts on the back of the lpg filler, this will be like the support bracket you used to get when you bought a radio years ago, just to support the wight of the fuel filler/prevent it twisting/rotating at all, peace of mind more than anything, the bracket i'll make out for some stainless sheet i have kicking around!
Image

the other thing i did was i used some plastic primer on the lpg filler cap, then i used acid etch primer as i did'nt have any other primer :oops:
i then dusted the filler cap in two coats of topcoat, this is not finishd i'll flat it a couple of times & recoat it untill i'm happy with the finish
Image
more to come over the next few days.......hope all looks to be up to spec??????

Gilbertd
Senior Member
Posts: 9258
Joined: Wed Apr 09, 2008 10:00 am
Location: Peterborough

Re: here we go DIY LPG INSTALL BY A COMPLETE LPG NOVICE.....

#19 Post by Gilbertd »

It looks like you're making a really nice job of it but if that is a 30 degree tank and the photo isn't lopsided, it a funny looking 30 degrees.......
96 Saab 900XS, AEB Leo, sold
93 Range Rover 4.2LSE, Lovato LovEco, sold
97 Range Rover 4.0SE, multipoint, sold
98 Ex-Police Range Rover 4.0, AEB Leo, daily motor
96 Range Rover 4.6HSE Ascot, AEB Leo, my spare


Proud member of the YCHJCYA2PDTHFH club.

lpgnovice
Member
Posts: 51
Joined: Wed May 09, 2012 6:40 pm

Re: here we go DIY LPG INSTALL BY A COMPLETE LPG NOVICE.....

#20 Post by lpgnovice »

your bob on there boss! the tank is'nt at 30degrees yet, a little adjustment needed there :oops: :mrgreen:

thats my last jonto do on the list before i fill the tank with lpg, i'm a bit unsure how to gt this measument right, its probobly super simple to guys in the know but i'm struggling to be honest, i know its only twiddle of the nuts on the tank mounting straps to give it quick scoot around to the right position, i think i have thought of a way to get it right so i'll update when i set up my probobly over the bloody top rig for getting it right :lol:

i think my mind will be at ease when i have all the high pressure lines in, fitting in working on it is a bit of a sod but i'm enjoying it....be flippin downing the cider when it all works well & is up & running i'll wholeheartedly admit :wink:

i've not bought an air fuel ratio gauge yet as some have to be calibrated to give the corect readings on lpg appaently ?????? investigation needed i think

Post Reply